Washing Machine Pipes
I have fit together some variations of washing machine pipes and photographed them to show you the most common configurations. I have used all of these arrangements, both in stud walls and exposed in unfinished basements. There are of course many other legal set ups. Send me a photo of yours if you want me to critique your DIY plumbing or make suggestions.
Let's start with the basics.
 |
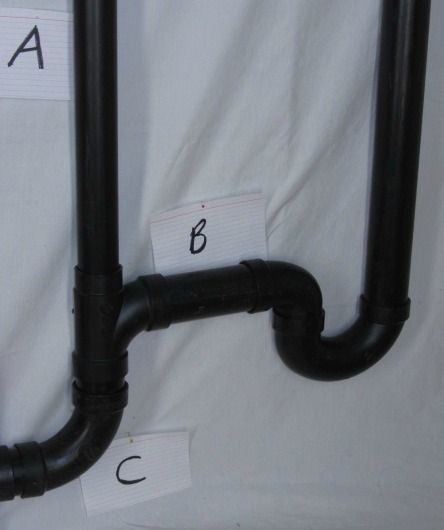 |
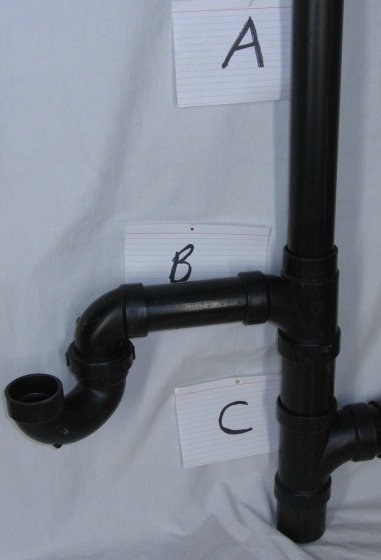
The piping in the photo on the left represents a laundry sink drain, while the photo on the right depicts a washing machine's stand pipe. In each A is the vent, B is the trap arm, and C is the drain.
You only have to remember this, the sanitary tee that serves each fixture is
the place where the trap arm, drain, and vent come together. The trap
arm, (the horizontal pipe down stream of the p-trap) always flows into a
sanitary tee. The fixture's drain and vent each begin at its sanitary tee. So, it is not a drain till it is down stream of the sanitary tee. We may install various fittings and join other fixture drains to drains but we may not do those things to trap arms. Things we do to trap arms have the potential to upset the protection the vent offers the trap seal, [the water in the trap] from siphonage. More on this later.
There are ways to add drains to vents, this is called vertical wet venting. The rules for doing this address distances, pipe sizes, and the specific types of fixtures to be joined in that fashion. Find the rules in the section of your local plumbing code in the vents section under "vertical wet venting". Remember when you do your DIY plumbing, the plumbing code is for your protection, it is not against you.
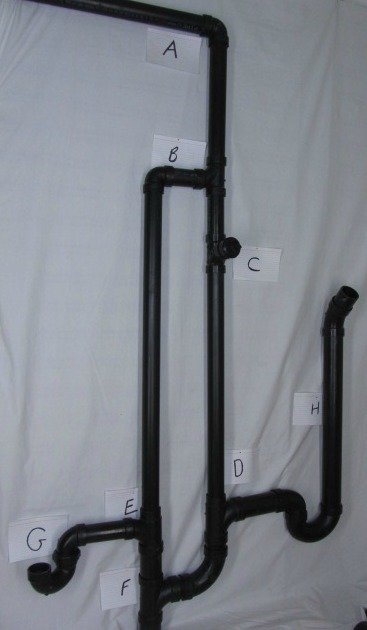
Assembly Option 1
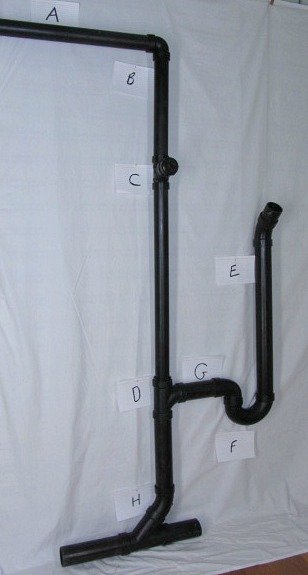
Here is the most common set up for what people refer to as washing machine pipes. In this image; A. is the vent, going to the roof or to join other vents on their way to the roof. The section "A" may be installed flat, no grade.
B. is a vent 90 degree elbow, [no sweep]. This fitting may only be used in a vent section, and not always there.
C. is a 1-1/2" sanitary tee with a clean out adapter and plug set into it. It is set above the overflow point of the fixture, the top of the section marked E.
D. is a 2" sanitary tee with a 2" x 1-1/2" flush bushing set into its top. It is the end of the trap arm, the origin of the vent, and the origin of the drain for this fixture. When the tee is set upright in this fashion we call it a stack vented fixture.
E. is the fixtures tail piece, the vertical section before, [upstream of], the trap. A washing machine pipes tail piece must be at least 18" but no more than 30".
F. is the p-trap, a washing machine pipes p-trap must be installed above the floor, at least 6" above but not more than 18" above.
G. is the trap arm, a 2" p-traps trap arm must be no longer than 60", have at least 1/4" per foot of grade, and have only horizontal off sets.
H. is the horizontal drain this fixture is joined to. It will be below the floor. Note the combination of the 2" wye and the 2" 45 degree elbow. This forms a 2" combo and is considered to be a long sweep fitting suitable for the flow of drainage from vertical to horizontal. Drainage flowing from the vertical to the horizontal requires a long sweep fitting.
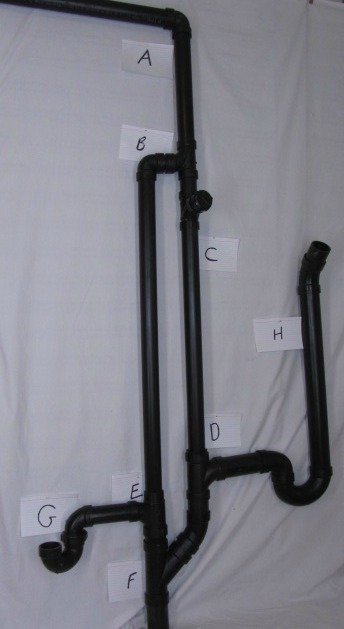
Assembly Option 2
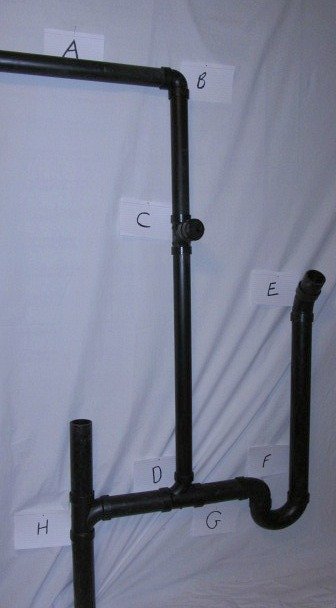
As you can see, A. B. C. E. F. and G. in this photo are the same as in the photo above.
D. is still a sanitary tee but now it is on its back with the vent originating from its side. It is a 2" x 2" x 1-1/2" san-tee. When the tee is laid down in this fashion we call it a flat vented fixture.
H. is the vertical drain this fixture is joined to. Note the san-tee used to join these pipes. A horizontal drain may flow to the vertical with a medium sweep fitting. A san-tee forms a medium sweep 90 degree elbow so we are allowed to use it to join a horizontal drain to a vertical drain.
Assembly Option 3
This photo shows a washing machine drain joined to a laundry sink drain. A. is once again venting the two fixtures to the roof.
B. is a 1-1/2" vent 90 degree elbow looking at an upside down 1-1/2" san tee. The san tee is upside down because its medium turn sweep must be aligned with the flow. The flow in a vent is toward the roof. If a vent tee were used it would have no direction as it has no sweep.
C. is once again the clean out and plug. This tee is right side up because its sweep must allow a drain cable to drop into the drain.
D. is a 2" x 1-1/2" x 2" san tee receiving flow from the trap arm and connecting the drain to the vent.
E. is doing the same job for the laundry sink, that fixture has a 1-1/2" trap arm and p-trap so E is a 2" x 1-1/2" x 1-1/2" san tee.
F. is a full 2" san tee joining the two drains. Note the medium sweep of the san tee where the flow is going from horizontal to vertical and the long sweep of the long turn 90 degree elbow where the flow is going from vertical to horizontal.
G. is the 1-1/2" p-trap that will serve the laundry sink. Unlike the solvent weld p-trap used for the stand pipe the sink trap has a union that will allow its removal. The plumbing code states that a 1-1/2" trap arm may not exceed 42".
H. is the stand pipe, the 45 degree elbow at its top is to bring the opining of the drain out though the face of the wall. If it is exposed, not in a wall, the 45 is not used.
Both these fixtures are stack vented.
Assembly Option 4
The difference here is the use of the 2' Wye and 1/8th bend where a san tee and 90 were used above. When the wye and 1/8th bend are turned in this manner we call it an "inverted combo". The inverted combo allows the two fixtures to join in a narrower fashion than the san tee and 90 would.
Assembly Option 5
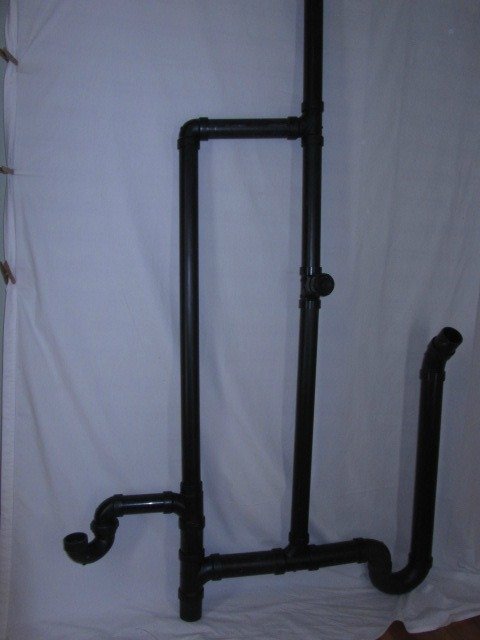
OK, here is one more. Now the laundry sink is stack vented and the stand pipe is flat vented. Its just legos with rules.
Speaking of rules, lets get back to drains, vents, and trap arms. The overall concept that rules the DWV, [drain waste and vent] portion of the plumbing code is the free flow of water by virtue of the free flow of air.
Water flowing down a vertical or horizontal pipe will flow freely enough to help keep the pipe clean if it can push the air that is in front of it and draw the air that is behind it. The term for this is "self scouring action". We want to push and pull the air at the roof, not the air in the rooms we live in. We want to maintain a specific amount of water in the p-trap of each fixture so that sewer gas cannot rise into the room that fixture is in. Sewer gas is warm due to exothermic bacterial action. Warm air rises. The plumbing code is based upon the immutable laws of nature.
If a fixture is not vented, drain water that fills the pipe leading from that fixture will pull upon the air in the room that fixture is in. At the end of that flow there will be negative pressure on the water in the p-trap of that fixture from the drain side of the trap. This may siphon the trap, leaving the room vulnerable to the free flow of sewer gas. The water in the trap is termed "trap seal". The vent, which allows free air to the drain side of the trap arm is termed "trap seal protection".
If a down stream fixture is not vented, water filling the pipe from an upstream fixture will create a positive pressure on the water in the trap of the down stream fixture from the drain side of that trap. This may push air past the water in the down stream fixture's trap, bubbling sewer gas into that room.
And yes I have seen all of those things happen and worse. The worst was when the outlet of a dental suction machine that was plumbed into the drain of the hand washing sink in the dental opperatory. Whenever the suction machine was running there was a constant bubbling noise from the sink drain as sewer gas was forced past the water in the trap.
Lastly, while I am on this subject, don't forget that even if all is plumbed properly fixtures need to be used to maintain trap seal. Run water into the drain of that never used fixture every thirty days or so, or cap or abandon it to protect the air in that room.
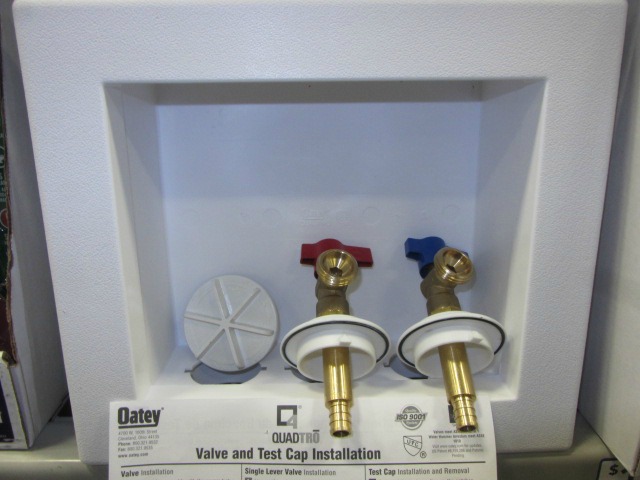
When the washing machine drains are in the wall the stand pipe may end with this box. This is my favorite version of an auto washer box because:
A. I can set the 2" waste and the hot and cold waters in any configuration I want to, I can even bring the waters from the top and set the valves upside down if I am working in a basement and the waters are dropping from above. Some boxes only allow the drain to be set in the center position. This may force me to use offset fittings in the stand pipe if the p-trap will not fit into the stud bay with its inlet in the center of the bay. I also do not like a 2" pipe between the two water pipes, as one of them will be forced to slip by the 2" pipe at some point.
B. The cap on the left side of the box is a test plug for my water test. With most boxes it must be cut out with a knife after the test instead of being removed undamaged as this cap would be.
C. The valves are ready for an RTI style Pex pipe and clamp like a "Shark bite". No soldering, no threading.
D. The valves are 90 degree stainless steel ball valves, no washers. The handles tell you by their position if the valves are on or off.
Need help with your washing machine drain? Visit my Washing Machine Drain page.