Vintage Wall Hung Sink Restoration
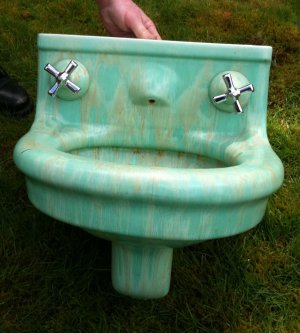
Today we started restoration work on a beautiful wall hung sink in a historic home in Portland. This antique bathroom sink is one of a kind... it was re-glazed over the white with the same glaze that is on the wall tiles in the room. It was then re-fired... most likely in the same kiln where the tile for the job was made.
This antique wall hung sink has...
- an integral spout, meaning that the spout is part of the china casting
- a shelf back faucet, meaning the faucet handles protrude from the back-splash of the basin
- an integral p-trap, meaning the trap is part of the fixture in the same way it is in a toilet or urinal. In order to have an integral trap in a wall hung sink, the trap outlet must gasket to a wall flange attached to the trap arm just as it does for a urinal.
- A stopper-less drain that may not be closed. I was advised that this fixture, which we always referred to as a shaving sink, is actually a dental cuspidor. Note the water stains under the rim, that is a wash down rim similar to the rim of a toilet. This wall hung sink is not a basin, it was not intended to hold standing water.
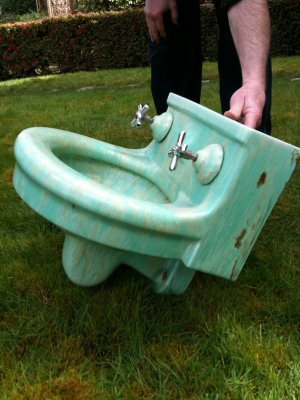
We're working on this antique wall hung sink because it was leaking down and into the wall when it was used. I had thought that the drain flange gasket was the trouble, but when we got it off of the wall we saw by the water marks left by the leak that the gasket between the faucet and the china facing of the back of the spout was our trouble.
First we disassembled the faucet and removed it from the basin. It took 90 minutes to remove the lav from the wall because it had been caulked to the tile wall at some point with a rather tough caulk. We had to be very careful not to either break the china on the wall hung sink, or damage any of the wall tiles.
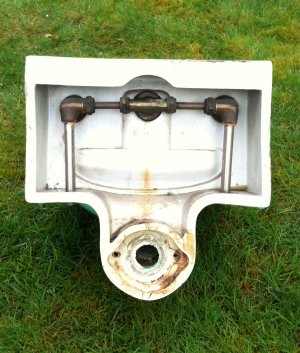
After the faucet was taken apart, we could loosen brass fittings that hadn't seen the light of day since 1927. The separate stem assemblies are joined to the spout tee by compression cone washers. They are the largest supply tube size used so there is a lot of surface area in the joint. That means we could expect lots of friction- and that is just what we got!
Using 10” wrenches on those 1/2” nuts was really nerve-wracking. We had to be very careful to balance the back hold so that there would be no pressure applied to the china of the wall hung sink. That was tricky, especially at the brass tee-to-spout connection which is held together by a thin brass nipple that threads into the tee on one side and lugs into the china on the other.
We finally got the main components separated so we moved on to the next phase of cleaning parts and surfaces. Then we could make our list of parts to find or make. Our first stop was Hippo Hardware here in Portland, Oregon. They had an excellent substitute for the old wall gasket which looked like a piece of braided asbestos rope embedded in a pound of putty. We also got the fresh cone washers we need.
Once we had our materials ready, we were anxious to get back to the job. Unfortunately, it would be several days before we could schedule a return visit to complete the job. One of the nice things about jobs that are delayed a few days is getting extra time to clean and closely inspect all of my parts. Having clean parts that you have confidence in makes reassembly move right along.
Once we returned, we spent quite a while installing the brass tee that inserts behind the china spout to supply it. This is also the fitting that receives the hot and cold water from the two stem assemblies. The fitting has two lugs that enter a double keyhole and then turn ninety degrees before a nut and gasket lock and seal it into that position.
The tricky bits were setting up the depth so that the lateral supplies would end up on the same plane thus keeping the cone washers true, and finding a finished torque that would impress the washer into the gasket yet not damage the brass or china.
We then installed the hot and cold stem assemblies. We had to feed the lateral tubes into their ports with the nuts, friction washers, and cone washers transfixed on them.
Once the stem assemblies were centered and tightened we could slide the cone washers and nuts to their places and snug them all around. We follow the mechanics rule that no nut is fully tightened until all nuts are started and run to at least hand tight.
We wanted to test this faucet off the wall because we only wanted to set it on its flange once. It took a while to get the supply threads adapted to the hose thread we needed to run our test out of doors. All of our joints held on the first test, so it was time to dry everything off and carry it to its home.
We had to cut one of the mounting studs screws off of the drain flange when we removed the fixture and we had made two new ones to use on the reset. The originals had been pan-heads and we wanted to use studs and finish them with dome-head nuts. We set the studs in only a few turns to make sure we would have enough thread showing to start the nuts. The reason this was even an issue is that we were going to be compressing the flange gasket, and until it was started we would be compressing it by hand.
The new flange gasket we planned to use to replace the original asbestos is a ring of dense closed cell foam. We tried to set it a few times but it didn't want to stay in place so I formed a ring of putty around it- just enough to hold it without any putty getting between the gasket and the flange. That was all it took!
We had already hung it and lifted it off enough times to know exactly where it should set on the hanger to insure the gasket would center up on the flange. The studs when tightened drew the fixture flush to the wall while compressing the gasket. Then all that was left was to set the supplies.
We used the original supply tubes because they are joined to the supply stops with a gasket and union. All we had to do was clean it up and provide new gaskets and cone washers. After a few “weeps” at the supplies we were done.
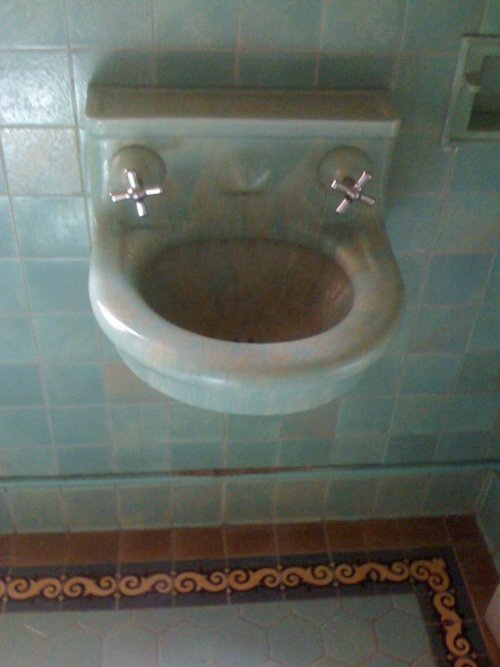
Mission accomplished... a beautiful antique wall hung sink saved! It's always both a thrill and a relief to finish a vintage plumbing restoration project like this that forces you to know, learn, search and invent.
Vintage Plumbing in Portland from Wall Hung Sink
Return to Antique Plumbing Fixtures from Wall Hung Sink
Plumbing Geek home page