Prevent Frozen Pipes
One thing homeowners should do to prevent frozen pipes is winterize outdoor hose faucets properly. While it's fairly easy to do, it's just a little bit technical.
Since you only need to do it once a year, it can be hard to remember
how to do it right. And the consequence of doing it wrong can be a lot
of damage.
I propose to give you the instructions for the task along with a few photos of the valves involved. You should print the instructions, put them in an envelope and post it near the service valve for the hose faucet.
There are a few different styles of hose faucets, and a lot of different places their service valves can be. I want to give simple instructions for the regular set-up. But before that, let's go over the uncommon frost free hose valve so you don’t go crazy looking for something that doesn’t exist in your house.
Frost Free Valve
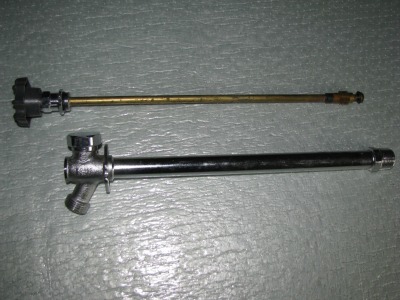
It isn't always obvious that a hose valve is a frost free type valve. The defining factor is that the washer is placed a the far end of a long stem that fits into a long tube. The water is stopped deep into the wall, far from the freezing weather. Because of this the handle is always perpendicular to the siding and that is your first clue. With many the water is seen to trickle out after the valve is closed. This is the tube draining out so water is not trapped in it where it can freeze and your second clue. The other telltale is that the valve is installed aligned with an interior or exterior wall that allows its length to be hidden, else it would protrude into a room.
If you have a frost free hose faucet, the plumbing code allows them to be installed without a service valve. This is because all you have to do to “winterize” a frost free valve is remove the hose from it and let it drain.
Some of the early anti-siphon models have a little plastic post at the hose thread spout that is “wiggled” to upset the anti-siphon seal. If you have that kind, it's more work to get it drained.
You might consider replacing it with a later model. In any case you want to see that the water does drain out of the valve regardless which style frost free faucet you are working with.
Drain all of them making sure that they are all frost free and you don't have one or more of each style. Leave the hoses off for the season. Once they are drained go inside and light the log lighter... you're done.
Dude... where's my service valve?
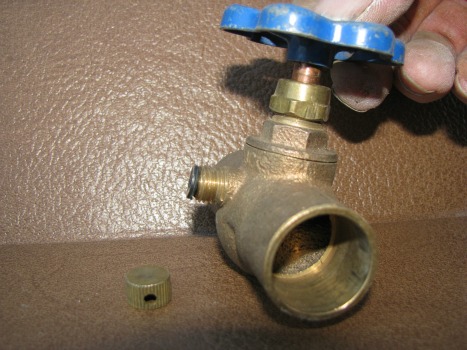
Any standard style hose valve should have a service valve. That doesn't mean that yours does. Where yours is depends on the year the house was built since the way things are done changes over the years.
If your house wasn't built by a regular contractor there's no telling where you'll find the service valve if there is one at all. Places to look are:
- In the crawl space along the pipe leading back from the hose supply pipe.
- In the basement along the pipe leading back from the hose supply pipe.
- In a kitchen or bathroom cabinet usually close to the hose valve but not always.
- Near the water heater.
- Next to your home's main water shut-off.
Follow these 7 steps to prevent frozen pipes
- Find the service valve for a particular outdoor faucet.
- Close the service valve.
- Remove the hose and open the hose valve (turn the faucet to the “on” position”) that is served by the service valve you closed.
- Place a container under the hose valve or have someone watch to see if water drains from the hose valve.
- Hold another container in place while you open the waste cap on the service valve.
- Watch for water to drain out of the waste cap, or for air to be drawn into the waste cap, or both in stages.
- Leave the waste cap loose, the hose valve open, and the hose off the hose valve.
If water has drained from one or both sides of the system down stream of the service valve’s washer or gate, you're done. If no water has drained from the system it is still in danger of freezing. The idea is to have empty pipe, so that you will prevent frozen pipe damage. Here's one last thing to do.
Inspect the waste cap to see if the gasket in it has stuck to the inside of the cap or the end of the thread under the cap. If the gasket is still holding onto the waste “nipple,” peel it off and check again to see if the system is draining.
Water must drain completely from that entire pipe section to prevent frozen pipes. The point of the task is not to just turn off the valve, but to establish a drained pipe.
It won't matter how cold the temperature gets if there's no water in the pipe to expand and do damage. Remember, the longer the run of pipe between the service valve and the hose valve the more water should drain out.
If you follow these steps, you should be able to prevent frozen pipes at hose valves, sparing you the time and expense of thawing and repairing them. Preventive maintenance is time well spent in the long run!
Prevent frozen pipes in exterior walls
Other than the glass itself the thing that makes fiberglass batting a great insulator is the fact that it not only is mostly air but that it keeps that air still. Still air is a good insulator. Conversely wind is a great robber of ambient heat. Freezing air tends to take warmth from the outside of a heated structure.If the air never stops moving warmth will be carried away much faster.
If there are water supply pipes in an exterior wall they should only be insulated with a barrier style of insulation, batting or foam board. That insulation should be only between the pipe and the outside wall.
When pipe in an exterior wall is insulated with a foam wrap it is protected from the warmth of the room as well as the cold outside. When it is installed in the midst of the batting the same scenario occurs. Pipe in an exterior wall should be installed just beyond the wallboard with no insulation between the two.
Avoid setting barrier type furniture, (book shelves or cabinets with backs and or doors), adjacent to water pipes in exterior walls. In the cases where it cannot be helped such as kitchen cabinets and bathroom vanities, keep the doors of those cabinets open during the worst of the freezing weather to prevent frozen pipes.
Prevent Frozen Pipes in Attics and Crawlspaces
While it is important to keep pipes in attics below the insulation and pipes in crawlspaces above the insulation it is just as important to keep the air in those spaces still. Breaches in the foundation such as crawlspace vents and access doors should be sealed tight throughout the winter. The attic air inlets known as bird blocking that are set into the roof eaves are great inlets for freezing wind. I have repaired many a frozen copper water line that was only inches from one of these openings.
In houses that have partial basements and adjacent crawlspaces there are often access doors that might be left open to allow basement heat to rise into the crawlspace during the worst of the winter cold. The same goes for pipes that enter into cantilevers, draw the insulation down a bit to let some warmth in when the freezing wind is blowing.
Outdoor pipes that rise from the ground in the yard or garden can most often be protected by simply pacing a bucket upside-down over them. The water has relief from the wind that way and can drop down into the ground to be replaced by warmer water from below before it can freeze.
In older houses that have not been updated it may be necessary to actually keep water running at certain fixtures in the house but with proper care this can be avoided.