American Standard bathtub valve restoration
I recently was called to repair a leaking antique American Standard bathtub. Actually, it was old enough to be a “Standard Sanitary” tub, from before they merged with the “American Radiator” and became American Standard.
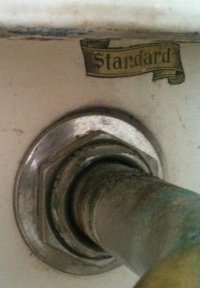
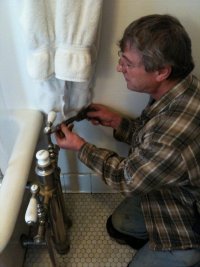
I was referred by Hippo Hardware here in Portland, to a customer with a plumbing emergency in a 100 year old home. The problem was described as a leaking valve. When I got to the job, I saw that it wasn't just a leaking valve, but a leaking fuller valve. And it was the biggest fuller valve I had ever seen!
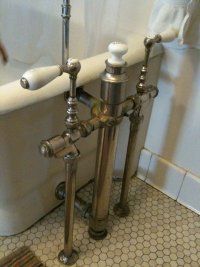
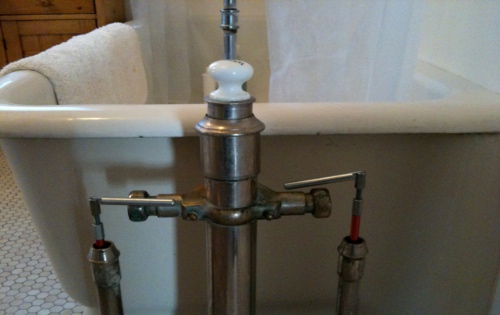
This particular valve is a STANDARD valve. It's part of a standing waste assembly attached to a 2-wall cast iron STANDARD tub. The tub is tiled into the wall. The 3/4” brass supply tubes don't have service valves.
The first order of business was to find a way to stop the water so I could take the valves to the shop while leaving the customers water on. I accomplished this with two 3/4” "Jet Swet" tools. The Jet Swets worked really well... nice little trick. So I took the valves home to my shop.
Upon disassemble I found the cold side was in poor condition, with a non-original ball stem that had been cut & rebrazed incorrectly. The hot side was entirely degraded, with a ball stem that had been repaired with solder. The balls were entirely deformed.
To fix the valves, I'd have to-
- re-machine the main stems or have new ones made
- replace the ball stems
- hone the valve seats
- make new packings and gaskets
It turned out that the Fuller balls couldn't be found anywhere and I'd have to make them too.
My first stop was Hippo Hardware to see what parts they had. I showed the disassembled valves to Tyler in the Plumbing dept, and asked him to show me all the Fuller valve stems he had... if any.
There were two stems in very good condition with eccentrics that were the right size & correct offset. Their shafts were smaller & shorter but I decided that I could marry their eccentric ends to the client's stems. There were also 2 acceptable ball stems. That gave me good brass parts to work with.
Next stop was a trip to the machine shop. I laid out the project before the machinist to show him what needed to be done on the main stems. The ball stems I would work up in my own shop.
I took apart the four ball stems I had, the two originals and the two I got at Hippo. I checked my own stock for large Fuller balls... no luck. It was obvious I'd have to search for large Fuller balls or figure out how to make them myself. Five phone calls to companies I thought might have them, and two wasted hours on the internet proved I'd be making them myself.
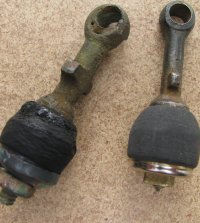
Time for some creative thinking. Where would I find rubber stock large enough? After another hour digging around thru odds & ends in the shop I sacrificed a rubber mallet. This had genuine rubber and was large enough for what was needed... not too hard or too soft.
I sectioned up the mallet with a hand saw, drilled a hole thru one piece, put a bolt thru it and mounted it on the drill press. It shaped up nicely with #60 grit sandpaper. I used a standard size Fuller valve as a model. The first ball took 2 hrs. to make! The second one took only 1hr.
Update, I now use a 1-1/2" thick sheet of neoprene I purchased at "Empire Rubber" here in Portland to shape fuller balls from. The shaping is done entirely with a Dremel tool. I make one in ten or fifteen minutes.
I had to mount the new balls on the brass ball stems with a fresh washer cup & nut. Some fine emery mounted on the Dremel cleaned up the valve seats. All threads, male & female, were cleaned of old debris, mostly Teflon tape. I also cleaned the union seats and in general prepped the valve bodies for reassembly.
This work was done Saturday. By Monday midday, the machine shop had called. The parts were ready. The stems looked great... better than I had expected. I'd taken the precaution, before the stems went to the machine shop, to arrow the tops of the stems to indicate the direction of the eccentric. This would guaranteed that my handles would turn the valves off in a fully flared out position. It was left to me to reassemble the stems following the arrows, and to solder them together.
After stem assembly and soldering it was time to see what I would still need to do. The new stem bases have a smaller diameter at the packing stop than the originals had and I would have to make some thrust washers to prevent unnatural wear and hold them on center. Making these washers took another 2 hours. Of course, everything is brass.
After that, all that was left was winding some packing string and greasing the brass on brass contact points. Assembly didn't take long.
I still had to test the valves before reinstalling them. Normally I test all my work with water at house-pressure, by fitting hose adapters to the feed side of the valve. But on a valve from this era, every thread is proprietary, meaning non-standard. So I could only test this work with standing water under the pressure of gravity. Once I'd done this and was satisfied, I was ready to return with the finished valves for re- installation.
The reinstallation went well but I needed more packing before I could successfully get the stems to seal. The new fuller balls worked great! I only wish I could have had my guy at Oregon Plating do his magic on the valve surfaces!
American Standard bathtub repair vs: home remodel
So, this sounds like a lot of work, right? It was. But this customer had been told, like most of my vintage fixture restoration customers, that the valve couldn't be repaired. The 1st plumber that looked at the job told the owner that he would need to remodel his vintage home in the historic Mt. Tabor area.
That would entail the removal of lead drains, removal of an original cast iron American Standard bathtub, an original nickel-plated valve, standing wastes with porcelains handles, an original hexagonal tile floor, and the temporary removal of his pedestal lav. This would cost (at least) $10,000.00 and would take at least 8 weeks.
The contractors involved would be a general contractor, tile contractor, plumbing contractor, electrical contractor, painting contractor. He'd need fixtures to replace original fixtures.
End result after calling Brian's Plumbing- the interior vintage architecture was preserved and the valve was fully restored in 2 weeks, for under $2000. No parts were shipped off, all work was done locally... several local businesses worked together to a great result.
This is what Brian's Plumbing and our Plumbing Geek website are all about- providing solutions to "unsolvable" problems. Satisfied customers are our only goal!
Return to Antique Plumbing Fixtures from American Standard Bathtub valve repair